Tuesday, February 19, 2008

Dad's Birthday Card

Here is a birthday card I made for my dad. His birthday was in January, but I am just getting around to uploading this card. The size of this is 4x8.

The base of the card is Blue Bayou. I had some left over DS paper (Winter Green) and used that for the bottom half.

The stamp is from PSX. As I didn't have any Chocolate Chip pigment ink, I inked my stamp with Versamark first and then with Chocolate Chip ink and clear embossed the image. Works like a charm everytime!

I added the Chocolate Chip strip in the middle along with the brads on either side.

I also wanted to try out my new Sale-a-Bration stamp but felt that it needed something else, so I added the ribbon to make it look like a medal. Thanks for stopping by!

Here's the recipe:
Stamps: PSX Vintage Car, Sale-A-Bration So Many Scallops
Paper: Blue Bayou, DS Winter Green, Chocolate Chip, Whisper White
Ink: Versamark, Chocolate Chip
Other: Brads, Ribbon
~Pat

Thursday, February 14, 2008

Rod's Valentine Card


Hi Guys,

Sorry for the little absence. It has been extremely busy for me at work and hard for me to keep up with my posting and stamping.

But here is a card I made for Rod for Valentine's Day.

I stamped the mice (Penny Black) onto cardstock vellum. Turned it around and coloured it on the back using my very few copic colour markers (it's a good thing I had the right colours too!)

I then stamped "kiss" (using the Scripty Bets from TAC) onto a white cs for the background. I then layered the vellum cs onto the white cs as I did not want to take away from my image. I think this is a really neat effect. I am so glad that I bought the Scripty Bets from TAC, but as I was cutting out each individual letter, I was cussing quite a bit wondering if I actually made the right decision - I did and love the effect.

Using red brads, I secured the vellum piece onto the white piece and then adhered to a red cs.

For the white background, I ran the cs through the hearts cuttlebug horizontally, moved my cs over to where it did not emboss, line up and ran it through the cuttlebug again.

I then stamped using my real red marker to colour in "You", "&", "Me") using the Fancy Flexible Phrases (retired) and stamped each in a heart. I then mounted it onto the red cs.

I stamped Happy Valentine's Day on the inside.

Here is the recipe:
Stamps: Penny Black
Paper: Real Read, Whisper White, Vellum Cardstock
Ink: Black
Other: Heart Cuttlebug, Red Brads, SU Markers and Copic Markers, Ribbon
Have a wonderfuly weekend and hope you find some stampin time!
Thanks for stopping by!
~Pat

Tuesday, February 5, 2008

Friendship Valentine

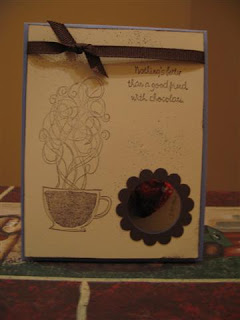
Here is a friendship valentine card using the Like it a Latte stamp set (retired). A fairly simple card to make.

I stamped the coffee cup, the steam and sentiment in Chocolate Chip. Using my 1" round circle punch, I punched a circle in both the very vanilla cs and the ballet blue cs. Then using a piece of chocolate chip scrap, I punched a circle out and then using my scalloped circle overpunched.

Also using my spritzer, I spritz chocolate chip and ballet blue all over the front.

On the inside I stamped a red heart where I adhered a chocolate heart to the cs. And last but not least, tie a ribbon.

Thanks for stopping by and have a great day!

Here is the recipe:

Stamp: Like it a Latte
Paper: Very Vanilla cs, ballet blue cs
Ink: Chocolate Chip
Other: spritzer tool, round scallop punch, circle punch, chocolate heart, ribbon

~Pat


Monday, February 4, 2008

Blue Ellie

Here is another card using the faux silk technique. Only this time, I stamped my little elephant onto blue plaid DS paper.

As you can see, he is very versatile and can be used as a baby card or birthday card.

Here is the recipe:

Stamps: Happy Heart Day
Paper: whisper white, black, pretty in pink cs and blue plad DS paper
Ink: black, pretty in pink marker
Other: Photo Corner Punch, heart brads

Thanks for stopping by! Check out my previous post for details.

~Pat

Happy Heart Day

This is my card that we will be making at my next Technique Tuesday class. The technique is called faux silk. It's amazing what can be done with a little tissue paper, stamps and ink.

I stamped my little elephant from the Happy Heart Day stamp set onto ww cs and stamped again onto DS paper and cut out. I then attached the cut out to my cs, and mounted it onto black cs. I punched out corners using the Photo Corners punch and matted it onto the back of the elephant panel.

Coloured the hearts and stems using my markers.

I then stamped the flower in Black ink onto tissue paper, coloured the hearts and let dry. Once dried, I crumpled up the tissue paper and smoothed out. Using the Anywhere Glue stick I applied glue onto ww cardstock and applied the stamped tissue paper. Then matted with black cs.

I then used the oval punch to punch out a real red cs and black cs. Stamped "Happy Heart Day" in black onto a scrap and punched out using the word window punch. Layered as you see it and mounted to my card.

I added 2 black brads and one red brad at the bottom right just to give it some more dimension.

Here is the recipe:
Stamps: Happy Heart Day
Paper: Whisper White, Black, tissue paper
Ink: Black, Pretty in Pink marker, Real Red marker & Green marker
Other: Red and Black brads, photo corner punch and oval punch.
Thanks for stopping by!!
~Pat

Sunday, February 3, 2008


Woohoo! ….take 20% off!

20% off what you ask? ……The Stampin’ Up! demonstrator
Starter Kit!

Starting today - Feb. 1st, until March 17th, the Canadian Stampin’ Up! demonstrator Starter Kit is only $208+PST (no S&H or GST).

I can’t even begin to tell you what an incredible offer this is! That is a savings of 20% off the regular kit price of $260 - that means you get $52 off! PLUS you can choose any stamp set - a value of up to $60.95–from the current catalogue - absolutely FREE and then you ALSO get to choose a FREE Sale-A-Bration set (from me) as an extra special "thank you" for joining my group.

You definately don’t want to miss this GREAT OFFER!

Beginning today - beginning NOW - you can order your Starter Kit online HERE at that reduced price (before you get started, be sure to write down the password "glitter junkies" as you’ll need it to fill out your application, then click on the "click here to enroll" link). Once you have done so, please contact me to let me know which SAB set YOU would like.


If you have any questions that you’d like answered, let me know! I’d be happy to answer your questions by email, phone, or even in person!
It’s Sale-a-Bration Time!

It’s Sale-A-Bration time again at Stampin’ Up! and free product is what it’s all about!
Every year Stampin’ Up! gives customers, hostesses, and new demonstrators the opportunity to earn fantastic, FREE, limited-edition stamp sets they’ll enjoy for years to come. New this year, in addition to 5 limited edition stamp sets you can choose from, Stampin’ Up! is also offering some awesome rub-ons!
Click HERE or on the image to see the brochure!

Here’s how Sale-A-Bration works:
CustomersWhen you spend $70 on Stampin’ Up! merchandise, you’ll receive a free Sale-A-Bration reward. There’s no limit-for every $70 you spend, you can select another free Sale-A-Bration reward.

HostessesWhen you host a workshop of at least $400 (before tax and shipping), you’ll receive a free Sale-A-Bration reward in addition to all of the regular hostess benefits!

New DemonstratorsDuring Sale-A-Bration, anyone who joins as a demonstrator can choose any stamp set–a value of up to $60.95–from the Spring-Summer 2008 Collection! Plus, you’ll receive 20 percent off the Demonstrator Starter Kit! I am SO excited about this - it is by far, the BEST deal Stampin’ Up! has had since I’ve been a demonstrator. You’ll receive over $400 of Stampin’ Up! products (that doesn’t even include the value of the free stamp set you get to choose) and business supplies for only $208! Best of all, you’ll join a growing team of fantastic Canadian demonstrators! If this is something that interests you then EMAIL ME today and we can get started on your application. Don’t live local to me? That’s okay, it’s all done online!

The Sale-A-Bration promotion starts on February 1 and runs through March 17, so don’t miss your chance to earn free products! Email me today to place an order, book a workshop or join my team!

Please note: Customer and hostess levels have been reduced to reflect recent price adjustments; the Sale-A-Bration brochure has the old amounts.