Tuesday, March 13, 2012

Lucky You . . .

Sunny Challenges 03012
Ok, so I am a bit late in posting my challenge. But thing is, at least I completed it! That’s what counts – didn’t I tell you how I suck at challenges? Anyways, the sketch is below and you had to use buttons to embellish your card:
I am hoping that this fits within the sketch:


On the inside, I stamped Thanks and added the little flower on opposite corners.


Here is a close up of my little rosettes.  The measurement for these tiny rosettes are 6 ½ x ½ inch.  While doing the arts and crafts segment with Colebrook Elementary, I pulled out my glue gun to help speed the process and thought why not use them with my rosettes.  I hot glued the rosettes onto a background scrap circle – that definitely help speed the process of gluing and holding!  You can see I punched the edges with the border scallop punch hoping to make the pleats look more like petals.  I like the way it turned out.

Here is the recipe:

Stamps:  Afterthoughts

Paper:   Lucky Limeade, Whisper White; Everyday Enchantment DS Paper

Ink:       Poppy Parade

Accessories:  SU Buttons, Grosgrain Ribbon, Scallop Trim Border Punch; Round Corner Punch
Have a wonderful evening and thanks for stopping by!
~Pat

Tuesday, March 6, 2012

In Your Element - 4th and Final Session

So my final session of In Your Element, we created thumb-print bunny cards.  I can’t seem to find my card as I think perhaps one of my kids may have walked off with it.  But I had the kids using their thumbs make a bunny face and ears – I used a heat gun to help speed up the drying process so that the kids could go and add their bunny face, whiskers and colour in the ears.  They then had to print on the front of their card “Some bunny Loves You!”  It was really neat to see everybody’s different version of bunnies – only I wish I had a photo to show you.


My second project – March 2nd was Dr. Seuss’ birthday.  So in celebration of Dr. Seuss’ birthday, we made pencil toppers using pipe cleaners - this Thing.  What a hoot – some of the kids got a taste of how hot the glue gets – but in my mind, I think they were over-exaggerating a bit.


and here is Mr. Cat in the Hat!

In the end, the kids were allowed to take home an edible treat – dirt and worms!  Of course, they all asked if what was in it real dirt!  Too funny!  I thoroughly enjoyed these 4 sessions and enjoyed the kids!  They were all very well behaved and very polite.  It was neat to see how their little faces lit up when they saw what they were going to make.  I am a bit sad to see the program end, but I am glad that I was able to participate and to teach the kids about some arts and crafts!

In Your Element - Session 3

I am a bit behind in my posting.  This is session 3 of 4 for the In Your Element project.  The Wednesday nite before the session, I received a phone call from parent buddy – we share  the classroom time – and the kids so that it isn`t as hectic.  Well my parent buddy informed me that she wasn`t able to make it on Friday, and asked if I would be ok to run the class on my own.   
Well my first thought was NO, how am I suppose to entertain 14 kids (8 of whom were 5 year olds) for an hour and a half.  But I had to think of something as I didn`t want let the kids down. 
I set down to planning, surfing the net, and planning – all of Wednesday evening, all day Thursday and Friday evening!  Hmm, can you see where my time was being held up. 

My first project was having the kids create a scenary card.  I managed to pick up some foam owl stickers from a LSS on sale.  I had the kids draw a tree so that they could place their own on a branch.  I then had them glue some cotton balls on top for the clouds and I had them take a muffin liner, fold in half, and glued it onto the front with a handdrawn  handle for the umbrella.  They then drew in the raindrops and decorated the cards as they saw fit!  Most of the kids had already decided who they were going to give their cards to.  What a blast!  You can`t go wrong with household items and gluing!

My second project – as I explained to them that February was heart month, they were going to create Mr. Heart Man. 
Finally my last project – everybody got to make a caterpillar magnet to hold their artwork together.

The best part of the day was when one of the kids commented – I wish everyday was art day!  I had soo much fun!  That made my day!  I managed to finish of the class with a story and everybody received some gummy hearts as a treat!

Get ready to put your sunglasses on . . . !

Ok, here is my second card – pretty bright huh – When I first started working on this card, I didn`t really envision on how it would look in the end.  I used some bright DS paper that I had on hand and layered it onto black cs.  I again cut the doily in half and adhered it onto the front. 
I then punched out a circle scallop, cut it in half, sponged the edges with Dusty Durango and adhered it to the middle of the doily. 
Because I thought the yellow was a bit too bright for me, I decided to sponge the edges with Dusty Durango – I love how that toned the brightness down a bit for me.
Using my Beautiful Wings Embosslit, I cut out a number of butterflies in different colours – adhered a smaller one to a medium one to give it a 3d effect and added a half pearl to each butterfly.  I hope you like it.
Here is the recipe:
Stamps:  Pretty Postage
Ink:  Basic Black, Dusty Durango
Paper:  Basic Black, Whisper White, Yellow DS (non-SU), Real Red, Only Orange, Green Galore, Not Quite so Navy, Tempting Turquoise, Orchid Opulence, and Pink (non-SU)
Accessories:  Doily, Circle Scallop Punch, Beautiful Wings Embosslits, Mini Half Pearls
Pat

Monday, March 5, 2012

Kathy's Doily Card

Here is Kathy`s card that she included for me!  I am sorry for posting a Valentine`s card in March, but I couldn`t open it until I had completed my challenge, so I am posting it now.  Beautiful job Kathy!  And thank you for thinking of me on Valentine`s Day!

This is also another Valentine`s Card I received from Joan Anthony.  See how she incorporated a heart doily within her card.

Doillies Challenge from Kathy!

There is a reason why I don’t participate in challenges very often.  A few weeks ago, I received a package from my lovely cyber friend, Kathy Pikwo. 

In it contained a package of doilies.  Well, to be honest, part of the reason for putting it off for so long was because I was stumped! 

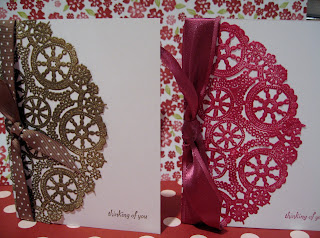
I hoed and I hummed and here is what I have come up with – this is cased from someone from Splitcoast – I brayered the doilies one in Purely Pomegranite and the other and Soft Suede.  Folded the doilies in half and adhered it to the cardstock – I guess this would make a great one layer card!  Added my ribbon and my sentiment and voila!  Here is my card – fairly clean and simple, I must say!


The only difficulty I had was gluing the doily without tearing it – it was a good thing the kids were not around because there was quite a bit of cursing – especially, when I had to redo them due to the tearing!

Anyways, if you would like to participate in this challenge, please link your card to my post so that I can see what you`ve created!  I would love to see other creations using doilies!


Because I challenged Kathy to make three cards, I feel like I need to make three cards myself – although, Kathy didn`t indicate that.  Don`t fret, I will get them done.  But I thought I better get posting before Kathy wonders what the heck I`ve been up to!  Thanks for stopping by! 
Here is the recipe:
Stamps:  On the Grow
Ink:  Soft Suede and Purely Pomegranite
Paper:  Whisper White
Accessories:  Purely Pomegranite Ribbon, Soft Suede Ribbon, Doilies
~ Pat

Saturday, March 3, 2012

Sweet Ellie

Happy Birthday Miss Maddie!

My niece’s birthday is today and she is turning 8!  She loves Hello Kitty, and I was going to make her a card, but I couldn’t find any sizzix / Cricut cartridges in time, so she will have to settle for Sweet Ellie!  I adore this little elephant!  I hope she enjoys the card as much as I have enjoyed making it!

Here is the inside of the card:


Here is the backside.  With the Happiest Birthday Stamp Set, I find it very versatile and wanted to add something to the back side.

It’s a good thing that I am hand-delivering this card as it would cost me a fortune to mail it!  Look at all the layers – If you count – there are 3 layers ton the front base of the card (not including the other layers)and on the inside, there is another 3 layers.

Here is the recipe:

Stamps:    Elebration, Happiest Birthday Wishes
Paper:       Whisper White, Riding Red Hood, Pretty in Pink, Bella Rose DS

Ink:         Basic Black
Accessories:  Silver spiral clip, blushing bride ribbon, Mini Heart Border Punch

Thanks for stopping by and let’s wish Maddie a Happy Birthday!

~Pat

Friday, March 2, 2012

Kathy's 2nd Corrugated Card

Hi everyone,

Kathy saw my post and re-scanned her second card - what a doll!  Here is her second card:

Isn't this the cutest card ever?!! Gotta love how she made the corrugated cardboard into a tree and the owl peeking from behind.  Kathy is sending over her 3rd card via snail mail, so when that one arrives, I'll post it.  In the meantime, I hope you all have a wonderful evening!
~Pat